25-step music production process checklist and video workshop >>>
Get Audio Equalization Techniques, Knowledge & Skills for Advanced Beginner Music Producers Right Now on This Page Below:
Audio equalization ranks up there with compression as both one of the most powerful and also most abused mixing tools in the producer's or audio engineer's tool-kit.
Like
compression, your EQ skills will take a while to develop. You need to train your nervous system to notice subtle differences in
frequencies in various contexts. You also need to know which equalizers to use and learn how to use said equalizers well. All this will take time, as you may imagine.
In this post you’ll get an introduction to audio equalization. You'll also discover concepts, methods and techniques to help you step up your producer EQ game. Finally, you'll find a list of action steps to take to make sure you get audio equalization down once and for all!
First the basics of audio equalization in the context of digital music production:
What's the Frequency, Kenneth?
Way before audio equalization there was humans, complete with ears and nervous systems. This, as you can imagine, means they could hear stuff, much like me and you. ;-)
One aspect of hearing is of course perceived loudness. Loudness is the way our ears, brains and nervous systems interpret the sound pressure level or amplitude of sound waves which reach our ear drums. We measure that in decibels (dB) as you probably know by now.
With all this of course we get dynamic range, the range of levels the human ear can perceive. This goes from the threshold of hearing to the threshold of pain at the softest and the loudest extremes.
Another aspect of hearing, closer to the subject of this post, is frequency or pitch. Frequency is the way we refer to the rate of oscillation of a sound wave. The faster the rate of oscillation, the shorter the wavelength, the higher the frequency and the pitch we perceive.
Frequency is measured and analyzed in Hertz (Hz) which is another way of saying "cycles per second". A 100 Hz frequency sound wave thus cycles through 100 times per second. A screechy 5 kHz does 5000 cycles per second.
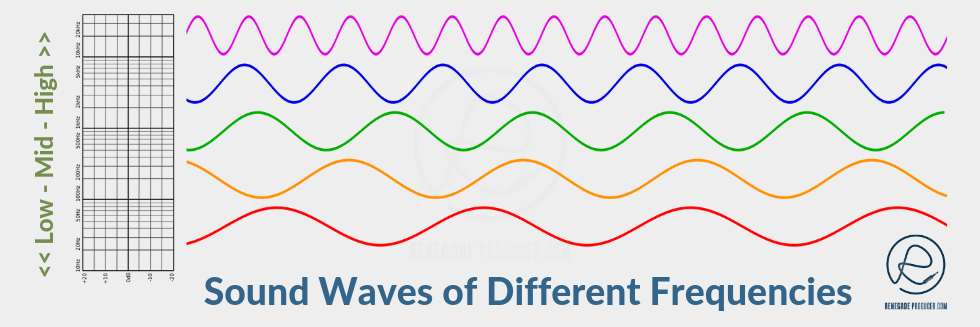
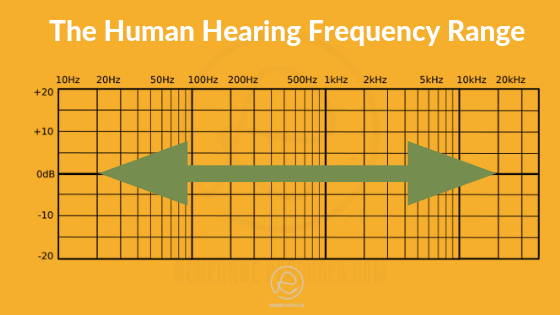
Humans can hear frequencies roughly from 20 Hz to 20 kHz. This is called the frequency range of human hearing and it differs from person to person. A working frequency range in the studio is usually narrower as you'll often cut everything below 30 Hz and rarely use too much above 16 kHz in any real sense in music. Most people cannot hear these extremes of the frequency spectrum anyway. Dogs on the other hand... ;-)
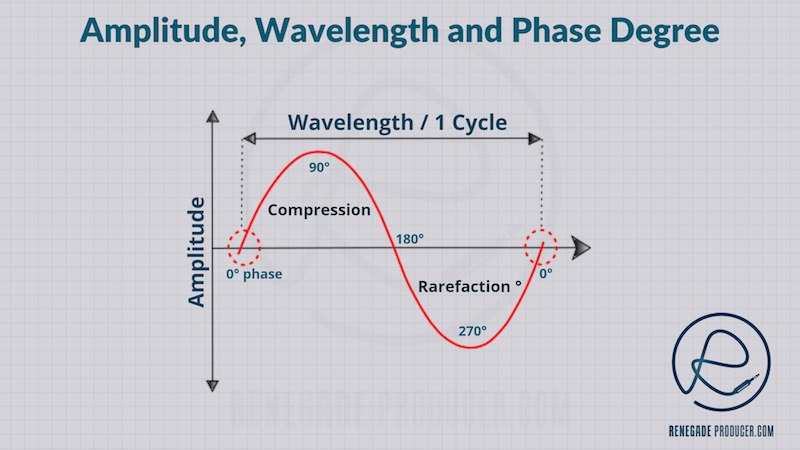
Another thing to keep in mind here is that a wave cycle has a positive and negative phase. This means that as an oscillator oscillates it can be at different phases in the cycle. Phase is measured in degrees.
Phase plays an important role in audio equalization and a good understanding of how EQ uses phase shift is quite fundamental to music producers. I suggest you read this post by Ethan Winer to understand how phase and EQ relate in both analog and digital forms of audio equalization.
So, to wrap up the background intro part...
Humans can hear frequencies between 20 Hz and 20 kHz and this is where all sound and music happens.
Any control over this aspect of audio and hearing is, as you can imagine, essential for music producers.
Enter audio equalization...
What is Audio Equalization (EQ)?
Audio equalizers or EQs make it possible to adjust the level of specific
frequency ranges in an audio signal, as determined by the EQ parameter
settings. EQs work through the use of different types of filters which
are designed to reduce or boost certain frequencies while leaving other
frequencies unaffected. An EQ can be seen as a combination of simple filters.
Different types of filters and EQs are used to achieve the tonal balance you want on individual channels and on your entire mix.
What are the Different Types of Equalizers?
The main types of traditional hardware EQs are:
- Shelving
- Graphic
- Parametric
- Semi-Parametric
Now, it's good to know that of these types of EQ you'll only run across shelving, graphic and semi-parametric EQs every now and then as producer. Parametric EQs are used all the time in music production.
Most producers nowadays however EQ in the box because of the ease-of-use and the immense quality and level of control offered by newer EQ plugins.
Types of Software EQ Plugins:
Vintage Emulation EQs:
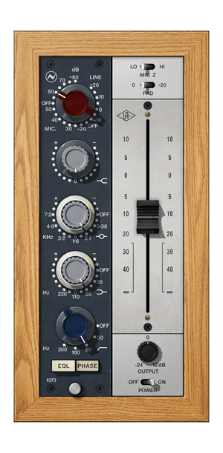
Just like with compressors, many plugins emulate the hardware favorites of old like Pultec, Neve, SSL and API equalizers. Examples of these types of emulation EQs are the Pultec
style Tube-Tech EQ Collection by Softube, the API 550 equalizers by Waves and the UAD Neve 1073, to mention a few.
These types of emulation plugins exist in most cases because they're good for getting specific results quite quick and also for the familiar tones or effects they often impart to your audio.
Check out this post by Marc Mozart to learn more about these vintage-style EQ plugins and get some insight on how to use them in your mix.
Non-Emulation Style or Freeform EQ Plugins:
Not all EQs are based on vintage models. EQ software has come a long
way since the classic 60s and 70s hardware models. Yes, with new user interfaces and tech
advances under the hood, we now have some serious control over our EQ
curves in the box.
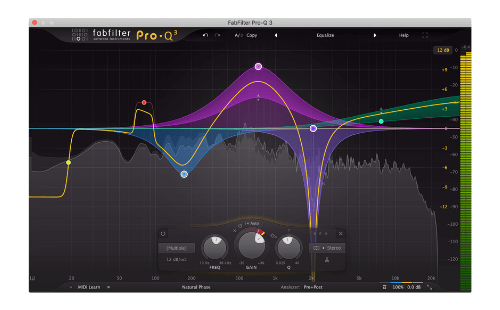
Non-emulation software or freeform audio equalization plugins like the fabfilter Pro-Q, for example, offers with up to 24 bands of EQ.
Each band also allows you to select from a range of common filter types.
That's just the tip of the iceberg when it comes to functionality.
But first, speaking of filter types...
What are the different types of EQ Filters?
Filters are the basic components of EQs. In short, filters attenuate certain frequencies in a signal while allowing other frequencies to pass.
The most common types of audio equalization filters you'll use are High Pass/Low Cut, Low Pass/High Cut, Low Shelf, High Shelf and Peak a.k.a. Bell filters…
- High Pass/Low Cut filters cut out everything below a certain frequency.
- Low Pass/High Cut filters cut our everything above a certain frequency.
- Low Shelf filters reduce or boost the level of frequencies below a certain point.
- High Shelf filters reduce or boost the level of frequencies above a certain point.
- Peak/Bell filters cut or boost everything within a certain set frequency range.
Check out the Big 5 filter type info-graphic right now for more on the different filter types and how they function.
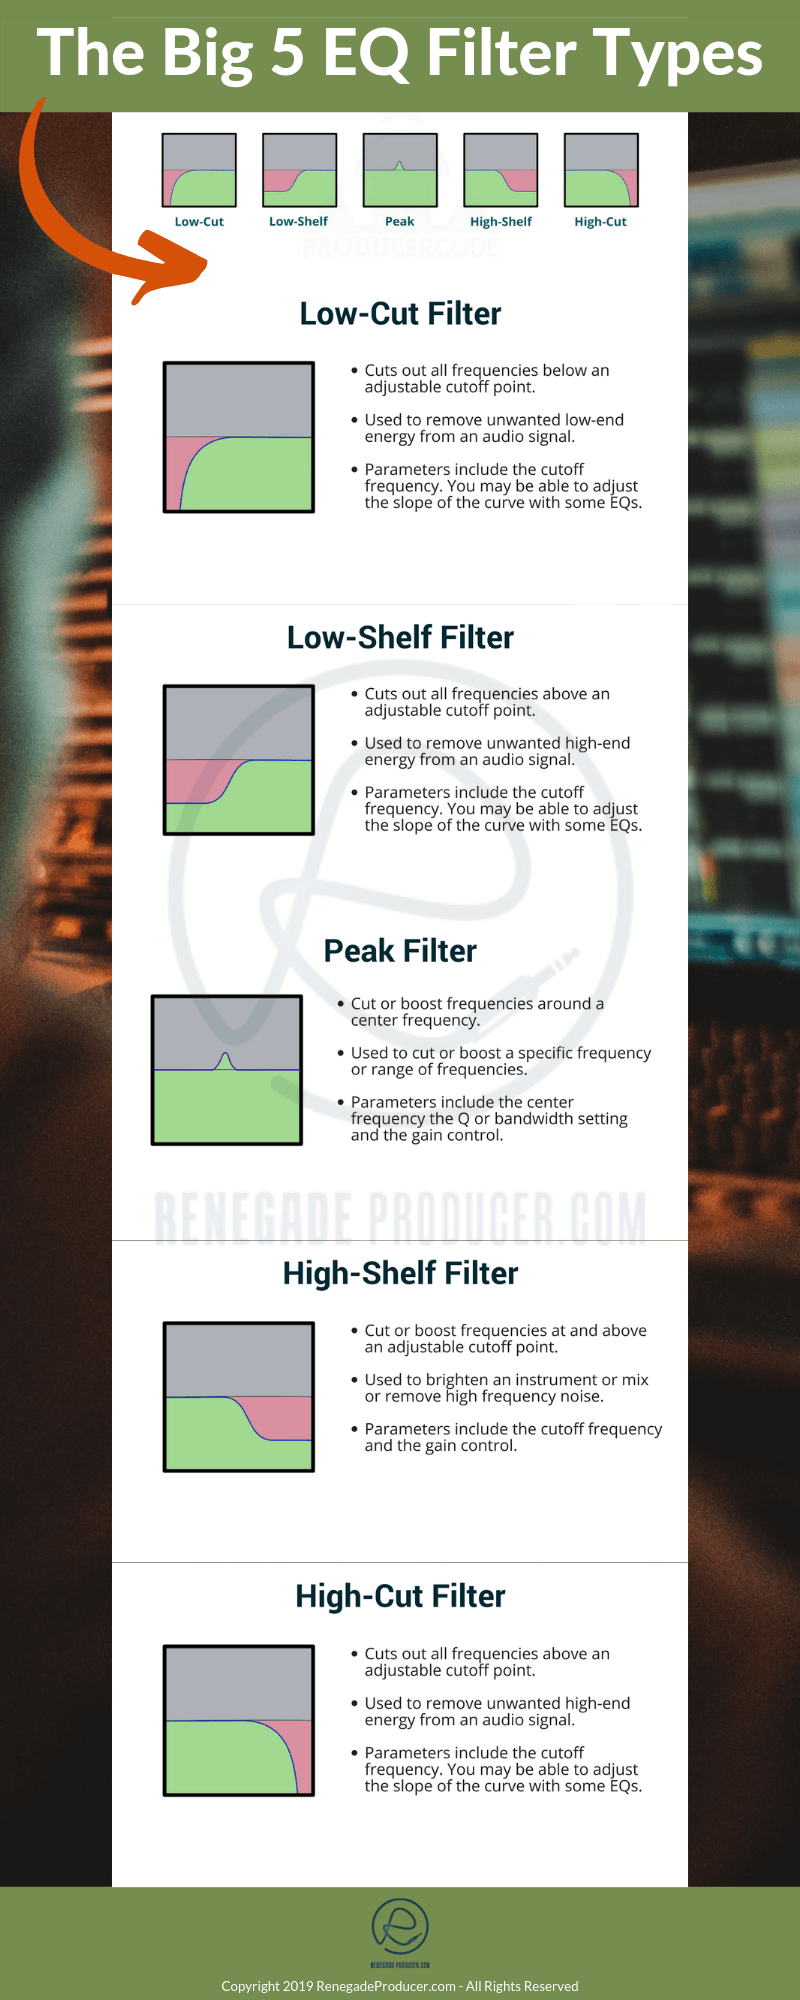
Check out this video below right now to hear the effect these Big 5 filters have when used on some delicious fizzy pink noise:
You can see now that audio equalization is a process of using a single filter or a combination of filters to adjust the tone or spectral frequency balance of an audio signal.
Now, it's time to understand the basic EQ filter controls you have available in most of the multi-purpose freeform type EQ plugins you'll use in 80% of cases while you're producing music in the box...
The Basic Audio Equalization Controls:
Cutoff or Center Frequency:
This control decides in which area of the frequency spectrum your selected filter or EQ will be active. This is often just referred to as the Frequency control.
With simple cut-only filters like low-cut or high-cut filters this is the cutoff point which determines where your filter will start to cut out frequencies in your spectrum. The rate at which the attenuation of the filter is applied is determined by the steepness of the slope (see further below).
With band-pass or parametric filters this is the center frequency around which a range of frequencies will be affected. The amount of frequencies affected either side of the center frequency is determined by the Q or bandwidth...
Q-factor or Bandwidth:
The Q setting or bandwidth control allows you to determine the amount of frequencies which will be affected around your center frequency when you're working with a parametric EQ.
A higher Q or a wider bandwidth setting will affect more frequencies around the center frequency while a lower Q or narrower bandwidth will affect less frequencies around the same center frequency,
Filter Slope:
Cut-only filters, high and low, and even some peak and shelf filters, allow you to adjust the slope of the cut. This is measured in dB per Octave.
So, a 12 dB low-cut filter slope means that the filter will cut out 12 more dBs for every octave you move down the frequency spectrum from the cut-off frequency.
Example:
Let's say you set your low-cut filter cut-off frequency at 440 Hz with a 24 dB slope.
This means that the filter will cut the octave below, half the cut-off frequency, 220 Hz, with 24 dB in level. At an octave below that, 110 Hz the filter will attenuate 48 dB.
Now, let's say you kept the cutoff frequency the same at 440 Hz and changed the slope to 12 dB.
This means now the filter will only cut the octave below, 22 Hz, with 12 dB in level.
An extremely steep slope will therefore cut more energy from the frequencies below the cut-off. It will also sound less natural because human hearing and natural sounds don't cut off so rapidly.
So, go ahead and low-cut at 20 Hz with a 48 dB slope if you feel it does the trick. At higher frequencies try a gentler slope if you don't want to draw attention to the filtering.
TL;DR: The steeper your slope = the more frequencies you cut below (low-cut) or above (high-cut) the cut-off point = the less natural the sound.
Try it for yourself and see!
Gain Control:
The Gain control sets the cut or boost level when you apply audio equalization with peak or shelf filters.
It will have a set range, for example +30 dB to -30 dB, which means you can cut or boost up to 30 dB with your filter or EQ.
Quick tip: Less is more. Smaller cuts or boosts tend to sound more musical and natural.
Now, let's take a moment to get some common questions about audio equalization covered:
Why is equalization required in mixing and music production?
A great mix in essence is a mix that is tonally well-balanced. Audio equalization is one way of addressing tonal imbalances in your mix. EQ also allows you to remedy clashes of similar frequencies in different instruments to make them work or fit together better in your mix.
EQ can further be used in a mix to accent a certain tonal quality for creative effect. This may be a boost in the higher mids to bring out breath in a vocal.
How do you use an equalizer?
An EQ can be used in two main ways in music production and mixing:
- Corrective EQ
- Creative EQ
What is corrective EQ?
Corrective EQ is used, for example, when a certain instrument contains unwanted frequency information. Let's say a bass is too boomy, and you remove the frequencies in a certain range to change the tonal balance of the bass.
Another example would be when two instruments or sounds with similar frequency content clash or audio masking occurs. In this case an EQ can be used to resolve the problem by cutting certain frequencies in one of the instruments and leaving or boosting the same frequencies in the other instrument or sound.
What is creative EQ?
Creative EQ techniques allow you to create interest in a mix or on a certain instrument. Basic examples would be using your EQ to create a telephone effect or automating your EQ filters to create filter sweeps.
So, if you’re using your EQ and you’re not hunting down and zapping offending frequencies from your mix, you’re probably applying creative EQ.
How do I get better at equalizing?
Great EQ technique comes from, as you can imagine, practice and experience.
The use of EQ in a professional scenario is also quite subjective to the engineer or producer, so audio equalization methods vary wildly. What follows is one powerful process or way to EQ better.
First determine your intended result...
Your overall intended result is of course a final master that translates well onto other systems and is fit for it's purpose.
You want to your radio edit to sound good on radio and your club edit to bang in the club. You may even want to strike a balance or compromise between the two.
In terms of the overall mix you can use an existing commercially released reference track that you know works well in the environment you are mixing for and aim for a similar EQ curve with your mix.
The reference track, as the name suggests, gives your ears and eyes a point of reference to work towards. That's the reference for your master stereo channel.
On the individual channel level you want to make sure all your channels combine to create your intended result on the master channel. You also want to make sure each channel works well with the rest of the channels to produce a coherent and pleasant mix.
How to apply EQ on an individual channel or instrument…
First, listen to the sound you want to EQ, imagine the sound you want in your head and then decide what needs to be done in terms of EQ to get closer to the sound in your head. Your internal thought process with audio equalization could go something like this…
... "That lead synth sounds so sharp it's almost hurting my ears. I think it'll sound better with a 3 dB cut at around 5 kHz with a medium-width Q setting."
Next, add your EQ to the channel insert and, with the EQ turned off, adjust the EQ settings to what you think will achieve the intended result you hear in your head. Then, switch on your EQ and listen.
Does it sound as you intended? No? Switch your EQ off.
Now you may think something like…
... "That is closer to what I want but it could do with a bit less sharpness. Maybe another 3 dB down will do the trick."
Then, tweak your settings to make your next adjustment. Switch your EQ on again.
Sounds good? Yes? Great.
On to the next one!
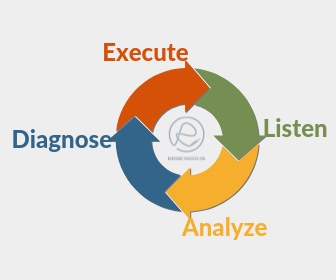
This audio equalization workflow process can be summed up in very simplified terms as:
- Listen - Pay attention to what's happening in the instrument and the whole mix.
- Analyze - Figure out where the issue lays.
- Diagnose - Decide what the issue is and how to solve it.
- Execute - Take action based on your diagnosis and go back to step 1.
A side-note on perspective:
Remember, your audio equalization decisions will always depend on the frequencies present in the channel you're working on. You can, for example, boost 250 Hz by 24 dB but it won't make any significant difference to the sound if the signal doesn't contain any information at that frequency.
Your EQ decisions on any particular channel will also depend on the frequencies present on other channels in your mix, especially channels that have similar frequencies present and channels that interact musically with the channel you're applying EQ to. In other words, changing the frequency balance on one instrument can make another channel sound different.
A classic example would be a bass that all of a sudden sounds more solid when you cut the low frequencies of a synth or guitar channel. The reason in this case would most likely be that your low frequencies present in the synth or guitar sound were interfering or even masking the same frequencies in your bass.
Once you cut the offending frequencies in the synth or guitar track your bass comes through better in the mix.
Audio Equalization Methods & Techniques:
Here are a few more simple but effective ways to level-up your audio equalization skills much faster:
1. Ditch the Cookie-Cutter

The EQ you apply depends on the nature of the material you're working with in the context of the mix. Run for the hills whenever you hear cookie-cutter EQ advice like "Boost 11k to make your vocals sizzle, bruv".
Let's take that advice… Imagine the vocal was recorded with too much 11k present? Should you still boost it for "sizzle"? Probably not a good idea.
Takeaway: Make your choices by using your ears, supplemented if needed with frequency analyzers.
2. Only When Needed
Should you EQ every track?
You often hear general tips like "Low cut everything except the kick and bass". Do you need to low cut an instrument that has no bass frequencies? No.
It's easy to do things just because you usually do them. Habitual EQ.
Tip: Don't. Every EQ move you make should have a valid reason. It should solve a practical or aesthetic problem in your mix or add something specific to it.
3. Think and Listen in Terms of Relationships
Instruments to other instruments. Kick & Bass, Kick & Snare, Vocals & Guitars/Keys/Pads/Synths.
You get the picture.
Listen to the relative instruments when you EQ. Listen to the complimentary synth as you EQ your vocal. Listen to your kick when you EQ your bass.
Listen to the rest of the mix while you EQ individual instruments in the mix. This trains your brain to listen to separate instruments as a unit.
4. Use EQ When You Layer
You may layer three different synth presets together to create one sound. One mono-ish synth to fill out the center low frequencies of the sound, one slightly wider mid synth to add body and one high synth extremely spread out for width.
Let's imagine all three synth presets were programmed to fill out the frequency spectrum across similar octaves or bands. That means the sounds will fight for space and mask each other, especially if playing the same note.
You could, for example remove the a lot of the high and mids from the low mono synth, remove lows and highs from the mid synth and remove the lows and mids from the high synth.
This helps you slot together the different parts to create a unified sound.
5. Split Your Spectrum in Separate Bands
Focus on the main areas of your frequency spectrum separately. Use filters to isolate the band you’re examining in your mix. Place a loudness meter or analyzer after the filter and take note of the results. Compare this to your reference tracks.
Isolate your low-end and A/B that with the commercial reference track again. What’s different between your track and the reference? Address the differences with your EQ, if needed. Do the same with other bands.
Learn more here about this technique in this post and grab your free EQ charts.
6. Calibrate Your Ears and Nervous System
You want to be able to recognize frequencies in different sounds in various contexts. This ability comes with time, as you produce more. You can however get more deliberate about your ear training.
The way to know which frequencies to cut or boost is to train your ears to recognize certain frequencies. Read this page on ear training and invest in good ear training software to speed up your progress.
You want EQ decisions to become something you do without even thinking. This can only be done when you have experience with the different frequencies in many different scenarios.
7. EQ Your Room
You may not be able able to do your dream studio build right now so you want to make the best of what you have at the moment.
This means you'll likely have a selection of typical small or odd-shaped acoustic room issues. You know the ones; standing waves, flutter echoes and room modes.
This means you can happily boost 250 Hz on everything oblivious to the fact that your monitoring "sweet spot" is right in the middle of a dip in the room for the same frequency.
Why is my mix so thin/sharp/muddy/boxy/boomy on other systems? Why indeed!
The way to address this is to figure out the issues specific to your room and resolve each issue as best you can with acoustic treatment.
Now, this can easily devolve into lengthy sessions with your measuring tape and online room mode calculators.
An easier, albeit pricier, way is to invest in room measurement and compensation software. This software allows you to not only discover issues in your room but also corrects them automatically on the fly.
A lot of the available room correction options are quite expensive and out of reach for many of us. One decent and more affordable option is Sonarworks, which also offers another version for headphone correction in addition to the room correction kit.
Translation to other playback systems becomes much easier when you’ve fine-tuned your room as much as possible.
Take Rapid Massive Action for the Win:
- Commit to train your ears at least once a week when you start out. 15 to 20 minutes at a time. Longer sessions may result in ear fatigue, so short is fine.
- Search for audio equalization techniques online. Implement a new technique every day for a week. Put it in your schedule and commit!
- If you're like me and want a bit of structure when you learn something new then you can grab an online course that covers audio equalization in a bit more depth. "EQ Fundamentals" by Producertech is a good place to start. Another course you can get is "Complete Guide to EQ", also by Producertech.
- Take some time to just sit and try all your current EQs on the same sounds or mixes. The more you know your equalizers the faster you'll be able to dial in the exact sound you want, when you want it.
- Check out iZotope's free EQ training and test your current audio equalization skill level.
- Remember to sign up for the Renegade Report below right now so you'll never miss out on new EQ tips!
Get More Skills for Your Producer Skill-Stack:


Learn to understand equalisers and frequencies to supercharge your mixing skills and get results, fast...

New producer? Learn everything you need to produce your first professional track right now...

Would you like to discover the simplest and easiest way to learn music theory as a music producer?
Share this post. Spread the knowledge so other producers can benefit too:
- Renegade Producer
- Producer Skills
- Audio EQ
ⓘ Some pages contain affiliate links so I might earn a commission when you buy through my links. Thanks for your support! Learn more
